Monday 19 February 2018

The Memphis Group's influence on 1980s aesthetic

I had always presumed that much of the 1980s aesthetic had drawn inspiration from Mondrian and the De Stijl movement.

However, last summer, a friend alerted me to a video that had appeared on YouTube.  Created as part of an article in Vox magazine, this video explains the significance of the Memphis Group -- an Italian collective specialising in postmodern furniture, fabrics, objects and architecture.

After reading the article it became clear that the Memphis had played a crucial role in the evolution of this 'look', defining many of the key characteristics that we associate with it.

The group's founder, Ettore Sottsass, had been responsible for a couple of designs that -- at first glance -- appear to have jumped straight from the Eighties.

Ollivetti Valentine portable typewriter (1969) by Ettore Sottsass
The bright, primary red glossy plastic flat surfaces of the Valentine typewriter would not be out-of-place in a 1982 Habitat catalogue; yet this was designed 13 years earlier.

Bacterio (1978) by Ettore Sottsass
The Bacterio pattern is obviously based on the appearance of micro-organisms under a microscope, but reverses the usual light-shaded-worms-on-dark-background to create a pattern reminiscent of zebra stripes or leopardskin.

The use of reds, yellows, white & black and triangles & circles follows a path traceable from the work of Russian avant-garde artist El Lissitzky (a role model for the Bauhaus movement).

Tahiti lamp (1981) by Ettore Sottsass

The group emphasised primitive geometric shapes, derived from Art Deco influences.  This can be seen prominently in the work of Californian designer Peter Shire, whose Bel Air chair design became a signature object for the collective.

Bel Air chair (1982) by Peter Shire
Michele de Lucchi's Lido sofa again shows the importance of primary colours and high-contrast patterns -- although looking somewhat like it's constructed from liquorice allsorts.

Lido sofa (1882) by Michele de Lucchi
Memphis' style isn't to everyone's tastes.  Fashion designer Bertrand Pellegrin, writing in the San Francisco Chronicle, described it as:
"a shotgun wedding between Bauhaus and Fisher-Price"
Prior to watching the Vox video, I had been unaware of the Memphis Group or its impact, especially in 1980s graphic design.  This major omission has now been corrected.


If you haven't seen the video then I strongly recommend watching it.

Thursday 29 October 2015

Applied Nostalgia: Everybody's Gone To The Rapture

A couple of years ago I was impressed by the release of Gone Home, an indie game set in 1995 with heavy use of applied nostalgia triggers.  The design included general period features and some beautiful detailing to evoke a strong emotional reaction as the player explored an abandoned home.

As someone with a strong interest in this area I was pleased to see nostalgic content appearing sporadically in other games (such as The Witness) but few were as steeped in it as Gone Home.  That is, until a few months ago when a new game appeared...

Everybody's Gone To The Rapture


I'd seen articles about this game online and investigated it a bit over the Summer; however, I finally got to see it properly in action at the EGX Eurogamer Expo in Birmingham.  And I was blown away.

First thing: this game is jaw-droppingly beautiful.  The Chinese Room have done an astonishing job on this aesthetically.


The game is full of nostalgia-inducing objects, including 1980s-period Ford Fiesta (and Cortina) cars and an old Commodore 64 style computer (with floppy disk drive and box-style CRT monitor).


There's even a metal push-button payphone (model CT24 if you're feeling particularly geeky about phones), which harks back to my post on the potential of telephones as nostalgia triggers.


The whole thing evokes the feeling of the "deserted village" episodes of 1960s/70s TV shows like The Avengers, UFO, or Doctor Who; period bicycles, a 1970s John Deere tractor, a 1960s-style Transit van ... the level of detail is astonishing.


Mind you, this isn't surprising -- the developers went to a lot of effort to recreate that tone:
"For Everybody's Gone to the Rapture, we really wanted to explore the very British apocalyptic sci-fi of the 60s and 70s," says creative direct Dan Pinchbeck. "John Christopher's The Death of Grass and A Wrinkle in the Skin, John Wyndham's Day of the Triffids and some of the really early 'cosy catastrophe' fiction like The Tide Went Out by Robert Wade."
— "Where literature & gaming collide" by Thomas McMullan, Eurogamer
While researching, I came across the website of Mark Silvester, an environment artist who recently graduated from the University of Portsmouth and was asked by The Chinese Room to do some asset work.  Nice to see novice designers pulled into this world.  Here's his (original 1979-style) Walkman:


This game really is quite a visual feast and, if you get the chance to watch any gameplay, do.  The PS4's power gives life to gorgeous metallic railings, glistening in the sunlight.


 I felt like I was swept back to the heady halcyon summer days of the 1970s, and that's a great confirmation of the power of nostalgia applied in video games.

Sunday 25 October 2015

VR the world; VR the children

OK, so I apologise profusely for the pun-tastic post title.  Since my last post I've been busy with all kinds of different things; my game projects have all crawled along in the background making s-l-o-w progress.  More significantly, I seem to have found myself becoming an evangelist-cum-apologist for Virtual Reality technology.

It's a bit of a weird situation.  The major commercial VR products are just about to hit the market.  There's been a flurry of activity this last year.  Early adopters are poised to pounce.  And yet there's also a resigned feeling that the whole thing will be a five-minute wonder.  I've heard the phrase "the next 3D TV" so many times that I'm thinking of getting a T-shirt made.

So, is VR going to take over the world?  Or will it be just a toy for the kids?  (Hey, I have to justify the title somehow!)

View-Master


The 
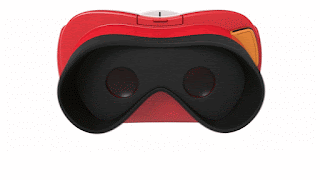
Mattel View-Master VR (which I blogged-about back in February) has finally hit the streets ready for the Christmas market.  You can already buy it from Amazon and Walmart (but, sadly, not in the UK yet ... and the rotters won't ship internationally).

View-Master VR with mobile phone.
(Credit: Harrison Weber, VentureBeat)
It looks pretty good.  A $30 (that's £20 sterling to you, guvnor) you get a plastic Google Cardboard.  One that won't fall apart or crumple when it gets sat on.

Mattel's GIF animation.  Don't blame me if it doesn't work on your screen!

I can't wait to get one.  Except I know what will happen: I'll look through the eyepieces and realise that I won't be able to use it.

The Problem of Interpupilary Distance


The problem is a simple one.  My eyes are too far apart.  (Yes, I've literally got a big head.)

One of the reasons that binoculars have a big hinge in the middle is because everybody's eyes are a different distance apart.  This interpupilary distance (IPD) creates a problem for VR systems, because they need to focus each eye on half of a stereo image -- and that's difficult when IPD varies so much.

A graph of typical IPD measurements.
(Source: research by Neil Dodgson, University of Cambridge)
The graph above shows that 95% of people sampled fell within the 55-70mm range.  Therefore a number of VR manufacturers tend to work on the basis that:

  • A fixed IPD of 63mm to 65mm will be comfortable for most of the population.
  • Fixed lens position is better than variable, because people will set a variable one wrongly anyway.  (That's Firefly VR's position, anyway.)

Google's own Cardboard specification originally presumed a fixed 65mm IPD, but that's complicated by the range of different phone screen sizes, which doubles the problem up.

My own 70mm IPD and big screen phone were enough of a problem that I needed to device my own scaled-up Cardboard template.

Oculus Rift & chromatic aberration


I picked up an Oculus Rift Development Kit (DK2 version) back in the summer and have been playing with adapting existing VR environments for it.

A VR-adapted version of The Lone Viking, a game (by my former students Grant & Chris) for the Unity game engine.
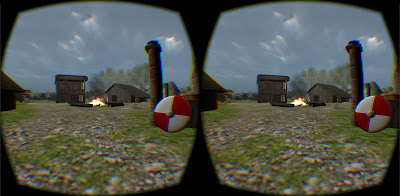
The DK2 tries to get around the IPD problem by adjusting the display output to the user, attempting to compensate for both eye position and focusing issues.  As you can see in the photo below, the kit comes with hefty lenses, switchable with near-sighted versions.

The DK2 unboxed.
(Photo shamelessly pilfered from Geeky Gadgets)

The lenses have a high magnification, which increases an effect called chromatic aberration.  This effect is demonstrated on the following image (courtesy of mabrowning)


Essentially, the shape of the lens distorts the light coming from individual sub-pixels on the display screen.  If your eye is off-centre of the lens then the colours won't position properly -- known as the "screen door" effect.  There's a nice article about the issue at VR-tifacts.

This is a big nightmare for fixed IPD devices.  Thankfully, it appears that Oculus have taken the plunge and the consumer version of the Rift will have a manual IPD adjustment slider.

Even with this, the issue of aberration is not completely diminished.  It's hard to stop the problem at the extremes of view, so you'll notice that the screenshot above shows some colour fringing where the software attempts to compensate for the problem.

Conclusions


Of course, the big advantage of the Oculus Rift is that you can move your head freely (although there's still a small amount of motion sickness on the DK2).  However, I was shocked to find that the image on my £10 made-at-home Google Cardboard felt better than the blurry one on £300 DK2.

This is likely a result of my big head -- sorry, larger-than-average IPD -- and I'm sure that a carfeully-adjusted consumer Oculus Rift will not have that issue.

And what are we going to use VR for anyway?  Gaming is seen as the killer app but I doubt companies like Facebook would invest $2 billion into buying Oculus on that basis alone.  At work we're already talking realistically about using it for training & education: from welding simulators to biology.

However, I can't help but think that the biggest quantity of sales for VR this next 12 months will instead be the toy market.  I think Google and Mattel have hit the jackpot in combining nostalgia with high-tech, and those of us with bigger-than-average heads will undoubtedly start cannibalising our cheap VR headsets to join in.

Thursday 5 March 2015

The Trouble with Mipmaps

In recent weeks I've been experimenting with developing content for the Google Cardboard VR system using Google's SDK plug-in for the Unity game engine.  For this job I've created a test room with some simple objects including chairs and a table.

For the table I decided to take advantage of symmetry to repeat texture elements, ensuring a good optical resolution across the full surface of the object.  This made sense, because the player would get close-up, and it added only a handful of extra polygons.

The table model (with fake shadow).  The table on the right illustrates the position of the polygon split.
As you can see, the table is split across the middle, allowing the UV map elements from one end to be flipped and overlaid over the other end.  Thus texturing one half of the table automatically textures the other half in mirror-image.  (I could have taken this further and cut it into quarters, but felt this would have made the symmetry-repetition too obvious to the eye.)

Optimising further, I therefore needed to texture only half of the table-top, a single leg, and one end/side panel.  The texture has baked-in ambient occlusion, too.

All well-and-good, but when I planted the table in the game engine a nasty seam appeared across the middle of the table, which got worse at certain viewing angles.


At first I thought this was a glitch from not sewing the UV sections properly.  However, after checking the original model and moving the camera away from the table, I realised that the cause was an old problem I'd first encountered last year: mipmaps.

For those not familiar with the concept, mipmaps (or MIP maps if you're a pedantic etymologist) are a tool used by game engines to reduce the 'cost' of drawing a 3D scene.  Applying a full-sized version of the texture is wasteful if the object is too far away to see its detail; therefore, the engine generates pre-rendered half-size versions of the texture which are used instead.

Original texture (256x256) with successive half-sized versions. Collectively, this set of textures takes up 33% more memory than the original texture. (Image adapted from Tom's Hardware Guide)
This illustrations indicates where different textures are used at different distances.
In principle mipmaps are a really useful tool for optimising performance.  However, they do have a nasty habit of killing sharp edges on textures.  I first encountered this when developing a modular road-building system for Unity.

On this section of road you can see where the central lines are blurred in the distance.  Far-away sections are textured with a lower-resolution image (i.e. black and white pixels averaged to grey).

In the case of the table, the "seam" edge of the tabletop was being merged with the black pixels nearby as the resolution decreased.

Room (distorted by VR camera) with table seam visible.

The easiest way to solve the problem is to disable mipmaps.  This can be done on Unity via the texture's settings.


However, disabling mipmaps means a greater cost when rendering.  On a mobile device that is a significant problem; after all, mipmaps were invented (and are enabled by default) for a reason.

In this case, thankfully, the answer was simple: to overlap the wood texture well beyond the seam edge to ensure that it averages to a wood colour even at lower resolutions.

Look!  Still using mipmaps but no seam, thanks to better UV texture mapping!
It just goes to show that it's good to be careful when matching texture patterns to UV maps: a couple of pixels overhang is not enough in critical situations -- a lesson learned the hard way.

Monday 9 February 2015

Unity Cardboard test #2

Following on from my initial test constructing a VR environment for Google Cardboard on the Unity game engine, I've been playing with capturing user input on the Cardboard system.

For this purpose, I've knocked-up a test room which I can populate with different objects.  Initially I've thrown a chair in there, to allow me to test whether an object has focus (i.e. dead centre of the viewport).

Test room design, using standard Unity shaders.  Approx. 1000 triangles (total) with four 512x512 textures.
Unity has a special library of low-cost mobile elements, optimised for smartphones & tablets, which have weak graphics & processing facilities (when compared with PCs).  Early iPhones are somewhere in the region of 20 draw calls per frame; to put that in context, a standard PC-style background skybox will eat up something like 6-10 drawcalls on its own.

The first thing I wanted to try to see how Unity's lightweight mobile shaders compared against standard shaders, because adding an extra camera (i.e. stereoscopic vision) is going to add some extra load (even if each camera's viewport is half the size).

The image above shows the version using standard shaders and a point light source, which pulled about 16-32 drawcalls on average.  On my battered old Galaxy Note, it ran OK but was a little sluggish to respond.

The image below uses mobile shaders, which pulled things down to 8-16 drawcalls.  The models & materials could be optimised further but I wanted to just get a ball-park feeling.  As you can see, there's a considerable difference in appearance, the chief one being that any lighting effects are going to need to be baked-in to the environment textures.

Same room model but using mobile shaders.
The other thing I wanted to test was the Cardboard SDK API.  Extracting info from Google's demonstration file, I wrote a script which kicked-in when the camera was looking at an object, changing the objects's shader to make it "light up".

Chair has been "lit" to indicate that it is currently selected.
Finally, I added some further script code to respond to the magnetic trigger on the side of the headset.  This would rotate the object by 45 degrees for each 'click', but only while the object is selected.

A rotated chair.  It's not exactly Halo 5 but it's a start.

All-in-all, this has been a very successful experiment.  I've gained a feel for how to interact with the API and now have the ability to interact with the user more.  Next up: movement and switching between objects.